💻 What is Hobby BASIC?
Hobby BASIC is a modern, structured BASIC interpreter for the classic Windows console (CMD.EXE), combining retro simplicity with ANSI graphics, networking, and direct Win32 API access.
Key Features:
- BASIC-like syntax with rich collection of specialized commands
- Full keyboard & mouse input in console
- High-compatibility ANSI X3.64/ECMA-48 terminal emulation
- UDP networking functions
- Standalone pseudo-executables
- Windows 7/8/10/11 compatible
- DRAW - ANSI drawing tool fully written in Hobby BASIC
- FPU string math & Win32 API support
- Super Tiny BASIC interpreter included with full source code
- Runs flawlessly for 10+ years across Windows 7, 8, 10, and 11
- Developed in 32-bit x86 assembly
🎯 35,000+ lines of polished game code and examples
🚀 Continuously evolving since 2015
My goal has always been to create a simple, user-friendly language designed for game development within the Windows console—and I believe it's progressing quite well!
🎥 Watch the full video tour on YouTube to see Hobby BASIC in action.
📦 Full Feature Overview
📋 Click to expand — Hobby BASIC – Full Feature Overview ▼
🔤 Language & Core
- Classic BASIC-style syntax with clean, retro-oriented structure
- Case-sensitive variables with dynamic name construction support (//)
- Labels (#) and anonymous labels (@@#, @b/@f directional jumps)
- Preprocessor directives (%INCLUDE, FIX)
- Extended operator set (arithmetic, logical, bitwise, compound, ++/--)
- Built-in constants (TRUE/FALSE, EOL$) and ENUM declarations
- Variable utilities (SET for bulk assignment, SWAP for value exchange)
🎮 Control Flow
- IF / THEN / ELSE conditional branching
- SELECT / CASE / ENDSEL multi-branch selection
- FOR / TO / STEP / NEXT counted loops
- WHILE / ENDW and DO / UNTIL conditional loops
- TIMES fixed-iteration loop, BREAK (exit), PASS (no-op)
- GOTO, GOSUB, RETURN for direct flow control
📊 Data Types
- 32-bit signed integers (primary numeric type)
- Mutable strings ($ suffix) with direct indexed character access
- String concatenation (+) and dynamic variable name binding (//)
- STATIC numeric variables with persistent state across calls
📚 Arrays
- 1D and 2D arrays (zero-based, type-homogeneous)
- Dynamic initialization and resizing
- Built-in array operations (SORT, SUM, MIN/MAX, MATCH, etc.)
- File and directory handling via string array methods
📦 User Types
- TYPE structures with named integer/string members
- Compact and block-based declaration syntax
- Arrays of structures with optional default initialization
⚙️ Subroutines & Functions
- SUB / ENDS with recursion support
- DEF single-expression functions
- Pass-by-value and BYREF parameter passing
- RETS for returning integer or string values
- LOCAL scope variables (scalars, arrays, TYPE instances)
📐 Built-in Functions
- Math & conversion (ABS, POW, VAL, STR, HEX, BIN, etc.)
- String processing (LEN, TRIM, MID, REPLACE, INSERT, etc.)
- File/system access (FILE, PATH, SIZE, GETLINE)
- Search & parsing (FIND, MATCH, SPLIT, EXTRACT)
- Networking (GETURL), timing (TIMER), random (RND)
🧮 Floating Point (FPU)
- Optional floating-point via string-based FPU operations
- Arithmetic, trigonometric, rounding, and comparison functions
- Configurable precision via system register V3
🖥️ Console & Graphics
- Full console control (cursor, colors, fonts, window state)
- ANSI rendering, import, and export support
- Advanced screen buffer operations (GRAB, PAINT, MOVE, SWAP, etc.)
- Clipboard access (COPY / PASTE)
- Screen snapshots and state stack (SNAP, STORE/RESTORE)
- Block memory operations (BSAVE, BLOAD)
🖱️ Input
- INPUT (prompt-based input)
- INKEY (key codes, modifiers, non-blocking input)
- MOUSE (position, buttons, pixel-level data)
📁 File & System
- File I/O (LOAD, SAVE, CAT for append)
- File system operations via FILE() (create, delete, rename, query)
- Directory listing via array$[].FILE
- Shell execution with output capture (EXEC)
- Remote script execution over HTTP (EXEC run URL)
🌐 Networking
- UDP networking (OPEN, SEND, QUEUE, CLOSE)
- FIFO-based message queue handling
🔌 System Integration
- Direct Win32 API access via SYSCALL (DLL calls, wide versions)
- BYREF array passing for structured data interop
- System/environment access via PATH() and PEEK()
🎵 Multimedia
- Sound playback (WAV, MP3)
🐞 Debug & Tools
- DEBUG window for real-time inspection and logging
- WAIT (timing control), PRINT (alias ?)
- Compact interpreter design
🚀 Deployment
- Standalone executable generation (bind .BAS into .EXE)
- No external runtime or dependencies required
ℹ️ Runtime & System Info
- System registers V0–V3 for return values and runtime state
- PEEK() for internal metrics (memory, timers, UDP state, etc.)
- PATH() for environment info and system dialogs
🪟 Compatibility
- Runs on Windows 7 / 8 / 10 / 11
- Designed for the classic Win32 console / CMD.EXE
- Compact, self-contained interpreter written in FASM
- Stable and maintained over long-term use
✨ Extras
- ANSI Draw tool written in Hobby BASIC
- Super Tiny BASIC included with full source code
- Free for personal use, learning, and experimentation
- Binary-only interpreter distribution
- Commercial use or redistribution requires permission
✅ Conditionals in Hobby BASIC
1. IF...THEN...ELSE Statement
The IF...THEN...ELSE structure is used to control program flow based on conditions.
Example 1: Simple IF Statement
IF SCORE >= 50
    PRINT "You passed!"
ENDIF
Example 2: IF...ELSEIF...ELSE
IF (GRADE$ = "A" AND ATTENDANCE >= 90) OR AGE > 18
    PRINT "Great job!"
ELSEIF (GRADE$ = "B" OR AGE <= 18) AND ATTENDANCE >= 50
    PRINT "Good effort!"
ELSE
    PRINT "Keep improving!"
ENDIF
Example 3: Nested IF Statements
IF AGE >= 18
    IF COUNTRY$ = "USA" THEN PRINT "You can vote."
ELSE
    PRINT "You are too young to vote."
ENDIF
Example 4: Single-line IF with THEN
IF BALANCE < 0 THEN PRINT "Your account is overdrawn!" ELSE PRINT "Balance OK."Example 5: IF without ELSE
IF LOGIN$ = "admin"
    PRINT "Access granted."
ENDIF
2. IIF Function
The IIF function evaluates a condition and returns one of two values.
Example 6: Basic IIF Usage
STATUS$ = IIF(SCORE >= 60, "Pass", "Fail")Example 7: Numeric IIF Example
DISCOUNT = IIF(QUANTITY > 10, 1, 0)Example 8: String Assignment with IIF
COUNTRY$ = IIF(COUNTRY$ = "", "Unknown", COUNTRY$)3. SELECT...CASE...ENDSEL Statement
The SELECT...CASE structure simplifies multiple condition checks.
Example 9: Simple SELECT...CASE
INPUT "Enter day of week (1-7): ", DAY

SELECT CASE DAY
CASE IS 1 :
    PRINT "Monday"
    BREAK
CASE IS 2 :
    PRINT "Tuesday"
    BREAK
CASE IS 3 :
    PRINT "Wednesday"
    BREAK
CASE IS 4 :
    PRINT "Thursday"
    BREAK
CASE IS 5 :
    PRINT "Friday"
    BREAK
CASE IS 6,7 :
    PRINT "Weekend"
    BREAK
CASE IS :
    PRINT "Invalid day"
ENDSEL
Example 10: SELECT...CASE without parameter
SELECT CASE
CASE TEMP > 30 :
    PRINT "Hot"
    BREAK
CASE TEMP >= 20 AND TEMP <= 30 :
    PRINT "Warm"
    BREAK
CASE TEMP < 20 :
    PRINT "Cold"
    BREAK
ENDSEL
✅ Loops and Control Statements
1. FOR...NEXT Loop
The FOR...NEXT loop in Hobby BASIC is used to repeat a block of code for a specific number of times.
Example 1: Basic FOR Loop with PASS
FOR I = 1 TO 5
    IF I = 3 THEN PASS
    PRINT I
NEXT I
Expected Output: 1 2 4 5
2. DO...UNTIL Loop
The DO...UNTIL loop executes a block of code repeatedly until a condition is met.
Example 2: DO Loop with PASS
I = 0
DO
    I = I + 1
    IF I = 2 THEN PASS
    PRINT I
UNTIL I = 4
Expected Output: 1 3 4
3. WHILE...ENDW Loop
The WHILE...ENDW loop repeats a block of code as long as the condition is true.
✍️ Note: Hobby BASIC uses ENDW instead of WEND.
Example 3: WHILE Loop
I = 1
WHILE I <= 5
    PRINT I
    I = I + 1
ENDW
Expected Output: 1 2 3 4 5
4. PASS Statement
The PASS statement is used to skip the current iteration of a loop. It is similar to the continue statement in C.
Example 4: Simple PASS Usage
FOR I = 1 TO 3
    PASS
    PRINT I
NEXT I
Expected Output: (Nothing printed)
5. BREAK Statement
The BREAK statement is used to exit a loop prematurely when a certain condition is met.
Example 5: Simple BREAK Usage
FOR I = 1 TO 9
    IF I = 5 THEN BREAK
    PRINT I
NEXT
Expected Output: 1 2 3 4
6. Nested Loops with BREAK and PASS
You can also use BREAK and PASS inside nested loops to control the flow.
Example 6: Nested Loops with PASS
FOR I = 1 TO 3
    FOR J = 1 TO 3
        IF J = 2 THEN PASS
        PRINT "I=", I, " J=", J
    NEXT J
NEXT I
Expected Output: I=1 J=1 I=1 J=3 I=2 J=1 I=2 J=3 I=3 J=1 I=3 J=3
7. Complex Example: Search for Prime Numbers
In this example, we will search for prime numbers up to a limit using BREAK and PASS.
Example 7: Search for Prime Numbers
LIMIT = 20
PRINT "Prime numbers up to ", LIMIT
PRINT 2, " ";

FOR NUM = 3 TO LIMIT STEP 2
    ISPRIME = 1
    I = 3
    WHILE I * I <= NUM
        IF NUM % I = 0
            ISPRIME = 0
            BREAK
        ENDIF
        I = I + 2
    ENDW
    IF ISPRIME THEN PRINT NUM;
NEXT
Expected Output: 2 3 5 7 11 13 17 19
✅ Functions in Hobby BASIC
1. Validated User Input (1–100)
This function prompts for numeric input and checks for valid range and characters.
Example: getValidatedNumber Function
sub getValidatedNumber()

    while 1
        ! prompt for input
        INPUT "Please enter a number (from 1 to 100):", num$

        ! remove whitespace
        num$ = TRIM(num$)

        ! check if input is empty
        if not LEN(num$)
            pass

        ! check for invalid characters (only digits allowed)
        elseif not INSET(num$, "0123456789")
            PRINT "Invalid characters in string, please try again."

        ! convert to number and check range
        else
            num = VAL(num$)
            if num < 1 or num > 100
                PRINT "Invalid value, please try again."
            else
                rets num     ! return valid number
            endif
        endif
    endw
ends

! call the function and display the result
number = getValidatedNumber()
PRINT "You entered:", number
✍️ Note: The INPUT command needs an active screen buffer to work.
view 11
screen 80, 30, 3000
2. Searching for a Value in an Array
This function searches for a target value in an array and returns its index if found.
Example: searchArray Function
sub searchArray(arr[], target)

    ! search for the target value in the array
    arr[].FIND target
    rets V0    ! return the index (0 if not found)
ends

! create an array with 50 random numbers (1–50)
dim numbers[50].RND 50

searchValue = 10

! call the function and store the result
index = searchArray(numbers[], searchValue)

! check if the value was found
if index <> 0
    PRINT "Value ", searchValue, " found at position ", index - 1
else
    PRINT "Value ", searchValue, " not found in the array"
endif
3. Loading File Content into an Array
This function loads lines of text from a file into an array.
Example: loadFileIntoArray Function
sub loadFileIntoArray(filePath$, lines$[])

    ! check if file exists (SIZE returns -1 if not found)
    if SIZE(filePath$) = -1 then rets -1

    ! load file contents into string array
    lines$[].FILE filePath$

    rets V0    ! return number of lines loaded
ends

! create a string array with 100 empty slots
dim fileBuffer$[100].ZERO

! load the file into the array and get the line count
lineCount = loadFileIntoArray("LICENSE-NOTES.TXT", byref fileBuffer$[])

! check for file not found error
if lineCount = -1
    PRINT "Error: File not found"
    end
endif

! print each line of the loaded file
for i = 0 to lineCount - 1
    PRINT fileBuffer$[i]
next
4. Swapping Two Values
This function swaps two values using a temporary variable.
Example: swapValues Function
sub swapValues(x, y)

    ! store the value of x in a temporary variable
    local temp = x

    ! swap the values
    x = y
    y = temp
ends

firstValue = 5
secondValue = 10

! swap the two values using byref parameters
swapValues(byref firstValue, byref secondValue)

! print the swapped values
PRINT "After swapping: ", firstValue, " and ", secondValue
5. Checking if a String is a Palindrome
This function checks if a string is a palindrome (reads the same forwards and backwards).
Example: checkPalindrome Function
sub checkPalindrome(inputString$)

    ! declare local variables
    local reversedString$
    local cleanedInput$

    ! remove spaces from the input
    cleanedInput$ = REPLACE(inputString$, " ", "")

    ! reverse the cleaned string
    reversedString$ = REVERSE(cleanedInput$)

    ! compare the reversed and original (case-insensitive)
    if UCASE(reversedString$) = UCASE(cleanedInput$)
        rets "The string is a palindrome!"
    else
        rets "The string is not a palindrome!"
    endif
ends

! call the function and display the result
result$ = checkPalindrome("Rotator")
PRINT result$
✅ The Stack in Hobby BASIC
In Hobby BASIC, the stack operates in a LIFO (Last In, First Out) manner and consists of 262,140 double words. You can manipulate it using the basic PUSH and POP commands or directly through the stack[] array.
✍️ Note: The stack[] array and the internal stack are the same. Any operation on stack[] directly affects the stack. However, commands like FILL, SHUFFLE, SORT, etc., do not update the internal stack pointer, so use them with care.
Example: Basic PUSH and POP
push 100
push 'A'
pop x
This sends 100 and the ASCII of 'A' to the stack, and retrieves 'A' into x.
Example: Multiple PUSH and Top Check
push 1, 2, 3, 'A'
top = PEEK(10)              ! Get top of the stack
print CHR(stack[top - 1])   ! Prints 'A'
pop 4                       ! pop 4 times
Sorting the Stack
x = 0
dim stack[10]               ! reinitialize stack with 10 elements
times 10 push x++           ! pushes 0..9 onto the stack
stack[].SORTD               ! now stack[] = [9, 8, …, 0]

for i = 0 to 9
    print stack[i]
next
Expected Output: 9 8 7 6 5 4 3 2 1 0 (Descending order)
Value Replacement
dim stack[5]
push 10, 20, 30, 20, 40
stack[].REPLACE 20, 99
times 5 pop x : print x
Expected Output: 40 99 30 99 10
Extra: Stack SHUFFLE
dim stack[5]
push 1, 2, 3, 4, 5
stack[].SHUFFLE
times 5 pop x : print x
✍️ Note: SHUFFLE randomly shuffles stack values. The result will vary.
Handling the Circular Stack
The Hobby BASIC stack is circular. When it becomes full, new values start replacing older ones from the beginning of the array.
Example: Circular Stack Behavior
dim stack[5]
push 1, 2, 3, 4, 5
push 6, 7
top = PEEK(10)
arr_size = 5
for i = 0 to arr_size - 1
    print stack[i]
next
Expected Output: 6 7 3 4 5
Reading Top to Bottom with Wrap-around
🔄 Always use mod to handle circular wrap‑around when reading from top to bottom.for i = 1 to 5
idx = (top - i + arr_size) mod arr_size
print stack[idx]
nextExpected Output: 7 6 5 4 3
Alternative: Simple POP
times 5 pop x : print xExpected Output: 7 6 5 4 3
The stack in Hobby BASIC is a powerful tool. Its circular nature makes it highly efficient not only for simple PUSH and POP operations but also for advanced manipulations like sorting, shuffling, and value replacements using the stack[] array.
✅ Drawing Tool Guide
Introduction
This drawing tool is developed in Hobby BASIC and designed specifically for use within the Hobby BASIC environment. DRAW can load, create, edit, and save ANSI images.
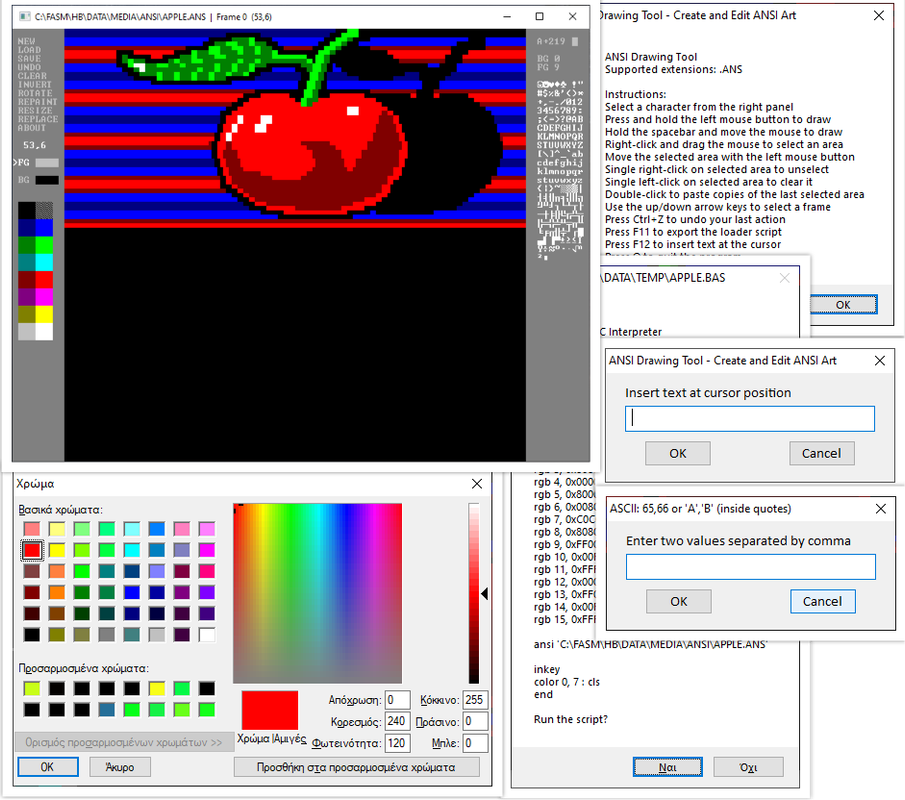
🎮 Drawing Tool Controls
🖱️ Mouse Controls
- Left-click (right panel): Select a character to draw with.
- Left-click + drag (canvas): Draw with selected character.
- Right-click + drag (canvas): Select an area.
- Left-click + drag (selected area): Move the selection.
- Left-click (selected area): Delete the selected area.
- Right-click (selected area): Deselect.
- Double right-click: Paste a copy of the last selected area (across frames too).
- Right-click (color picker): Open RGB color dialog.
⌨️ Keyboard Shortcuts
- Spacebar + mouse move: Eraser mode (draws with background color).
- ↑ / ↓ Arrow keys: Navigate between frames.
- Insert: Load a saved RGB scheme from
DATA\TEMP. - D key + mouse move: Color dropper (picks color under cursor).
- Ctrl + Z: Undo last action.
- F11: Export current drawing as a
.BASloader script. - F12: Insert text at cursor position.
- Q: Quit the program.
🎨 The Attributes Picker
Click on the BG or FG labels to select background or foreground color. Then choose one of the 16 colors from the picker.
💡 Tip: Right-click on the labels to swap foreground and background colors. If an area is selected, the swap applies automatically.
✍️ Note: This method overrides color number 8 (GRAY) as it's used for temporary storage.
🟦 The Color Dialog Box
Right-click on any color in the color picker to open the RGB dialog. Changes affect the entire DRAW window instantly.
💾 About Color Schemes
When you save an image (.ANS), DRAW automatically stores its color scheme in DATA\TEMP as a text file with the same name (e.g., MYIMAGE_SCHEME.TXT).
To load a scheme:
- Option 3 from the main menu at startup, or
- Insert key anytime while using DRAW.
🔧 Function Keys (F1-F10)
- F1 – Start a new drawing
- F2 – Open a drawing (.ANS file)
- F3 – Save the drawing (.ANS file)
- F4 – Undo last action (same as Ctrl+Z)
- F5 – Clear the selected area
- F6 – Invert colors in the selected area
- F7 – Rotate the selected area
- F8 – Repaint selected area (swap BG/FG colors)
- F9 – Resize selected area (double its size)
- F10 – Replace characters in selected area
🪟 Windows 10 & 11 Compatibility
For proper display, enable Use Legacy Console:
- Right-click the app title bar → Properties.
- Go to Options tab.
- Check Use Legacy Console (Windows 11 24H2+ instructions).
- Restart the console.
✅ Creating Snapshots
Introduction
The DRAW program, Hobby BASIC's drawing tool, offers three options when starting:
- Default mode: Font 8x12 with a canvas size of 80x50 cells.
- Alternative mode: Font 8x8 with a canvas size of 80x75 cells.
- Load RGB color scheme: Loads a color configuration from the DATA\TEMP folder.
⚠️ Note: Options 1 and 2 define the font and canvas size used during your drawing session. Make sure to choose the correct mode when loading an image you previously created, to match its original dimensions.
Loading an ANSI Image
For example, if we save an image named TEST.ANS in the DATA\MEDIA\ANSI\ folder, we can load it as follows:
! ROWS = 80
! COLS = 25

screen 80, 50, 0
cls
ansi PATH("DATA\MEDIA\ANSI\TEST.ANS")
inkey
The critical setting here is ROWS, which must be 80.
Saving a Portion of an Image
The following code creates a new ANSI image, TEST1.ANS, with a size of 40x25 from the original TEST.ANS file.
screen 80, 50, 0
cls
ansi PATH("DATA\MEDIA\ANSI\TEST.ANS")
ansi 0, 0, 40, 25, PATH("DATA\MEDIA\ANSI\TEST1.ANS")
inkey
Loading the Cropped Image
To load TEST1.ANS, the console window must match the image size:
screen 40, 25, 0
cls
ansi PATH("DATA\MEDIA\ANSI\TEST1.ANS")
inkey
ℹ️ Using SNAP for More Flexibility
SNAP loads a snapshot file at position x, y, or saves a rectangular area of the screen to a file. Snapshot files require the .HB extension. SNAP allows us to load an image of any size into a console window of any dimensions (as long as it fits within the window).
✍️ Note: Since version 2.4.5, the SNAP command now automatically includes the console's 16-color palette. This means:
🔹Perfect color reproduction every time
🔹Backward compatible with older .HB files
Creating and Loading a Snapshot
To load TEST.ANS and create a snapshot named TEST.HB with a size of 40x25, use the following code:
screen 80, 50, 0
cls
ansi PATH("DATA\MEDIA\ANSI\TEST.ANS")
snap 0, 0, 40, 25, PATH("DATA\SNAP\TEST.HB")
inkey
Now, we can load this snapshot at any position within the console window:
screen 80, 50, 0
cls
snap 10, 10, PATH("DATA\SNAP\TEST.HB")
inkey
👉 SNAP 2D tile engine tutorial (FASM forum)
✅ Hobby BASIC - Try These
📌 Built-in Functions Overview
Useful one-liners and built-in functions:
print ABS(-10)                ! 10
print RND()%100               ! random number 0-99
print STR(25) + " years"      ! "25 years"
print FORMAT(1, 23456)        ! "22,9 KB"
print PAD("42", '0', 5)       ! "00042"
print EXTRACT("abc123!@#", 0) ! "123"
👉 Use PAUSE or INKEY to prevent the window from closing.
🧵 Strings in Hobby BASIC
String manipulation with built-ins:
a$ = "Hello World"
print LEFT(a$, 5)         ! "Hello"
print RIGHT(a$, 5)        ! "World"
print REVERSE(a$)         ! "dlroW olleH"
a$(0) = 'h'               ! Change first char (0-based)
🧮 Arrays (1D & 2D)
Working with arrays and array functions:
dim nums[5] = 5, 3, 1, 4, 2
nums[].SORTA
nums[].PRINT 3

nums[].REPLACE 3, 99
nums[].PRINT 3

! 2D example:
dim matrix[2, 2] = 1, 2, 3, 4
print matrix[0, 0], matrix[1, 1]  ! prints 1 4
Example: Load file into string array and display lines.
dim lines$[100].FILE PATH("LICENSE-NOTES.TXT")
lineCount = V0

for idx = 0 to lineCount - 1
    print lines$[idx]
next
🎨 Console Drawing & Screen Tools
Manipulate screen output using built-in commands:
cls
color 1, 14
print "Yellow on Blue!"

paint 0, 0, 80, 25, 'Α', 1
invert 10, 10, 15, 5
redraw 10, 10, 15, 5, 'Α', '-'
You can redefine any of the 16 default console colors using the RGB command:
rgb 1, 0x00A5FF   ! Set color #1 to orange
color 0, 1
print "Now using custom orange text!"
You can also use the alternate format with separate RGB components:
rgb 1, 255, 165, 0 ! equivalent to rgb 1, 0x00A5FF (note: color is in 0xBBGGRR format)This allows for personalized color schemes inside your apps or tools built with Hobby BASIC.
📂 File & Snapshot Utilities
Working with files and snapshots:
! Load text from file into array
dim lines$[]
lines$[].FILE "LICENSE-NOTES.TXT"
for i = 0 to SIZE(lines$[]) - 1
  print lines$[i]
next

! Save a portion of screen
snap 0, 0, 40, 15, PATH("DATA\SNAP\TEST.HB")

! Load the snapshot
snap 10, 10, PATH("DATA\SNAP\TEST.HB")
🔁 Mini Lab: Digital Clock
Create a simple digital clock:
while 1
  print at 0, 0, LEFT(PATH(10), 8)    ! system time
  wait 1000
endw
🗺️ Mini Lab: Three Points with TYPE
TYPE is a user-defined structure that can hold variables or strings (classic syntax):
! Define a Coord structure for 3 points
type Coord (x, y) 3

! Assign coordinates to each point
Coord:[0].x = 10 : Coord:[0].y = 5    ! Point 0 at (10,5)
Coord:[1].x = 20 : Coord:[1].y = 15   ! Point 1 at (20,15)
Coord:[2].x = 30 : Coord:[2].y = 25   ! Point 2 at (30,25)

! Loop through and print each point
for i = 0 to 2
    print "Point ", i, ": (", Coord:[i].x, ", ", Coord:[i].y, ")"
next
✨ Block syntax with ENDT (available from version 2.5.4+):
! Define a Player structure with default values
type Player
    Name$ = "Unknown"
    Score = 0
    Level = 1
    Class$ = "Novice"
endt 3

! Initialize first player
Player:[0].Name$ = "Aragorn"
Player:[0].Class$ = "Ranger"
Player:[0].Score = 1500
Player:[0].Level++

! Display all players
for i = 0 to SIZE(Player:[])-1
    print Player:[i].Name$; Player:[i].Class$; Player:[i].Score; "Lv.", Player:[i].Level
next
Both syntaxes work, but the block style offers better readability for complex structures.
⌨️ Keyboard Input
Wait for a key press and display the key code:
LOOP#
    inkey

    ! V0 = Keycode
    ! V1 = SHIFT,  ALT,  CTRL, etc.
    ! V2 = F1..F12,  INS,  DEL,  HOME,  Arrows Keys

    print "Key:", V0, " Mod:", V1, " Extra:", V2

    if V0 = 13 then print "Enter was pressed"
    if V0 = 27 then end     ! Exit with Esc

    goto LOOP
🖱️ Mouse Tracking
Track mouse position and button state:
while 1
    mouse

    ! V0 = mouse x
    ! V1 = mouse y
    ! V2 = button: 1 left,  2 right,  4 double-click

    print "X:", V0, " Y:", V1, " Btn:", V2

    if V2 = 2 then print "Right click!"
    if V2 = 1 then break    ! Left click to exit

    wait 1
endw
✍️ Note: Mouse input requires no screen buffer.
view 11
screen 80, 30, 0
✅ Hobby BASIC - Advanced
⚙️ FIX and TIMES
FIX replaces code before execution, letting you use alternative keywords or rename commands.
TIMES is like a compact loop. It runs a single-line command multiple times using V3 as the counter.
wait1Sec fix wait 10
display fix print

times 100 display V3 : wait1Sec
With the above fix, you can write display instead of print, or even use your native language!
📝 Full Wide & Greek-native support with fix command
Hobby BASIC is fully Wide-native, supporting Greek identifiers and keywords. To use Greek keywords in your code,
first declare them with the fix command, linking the Greek word to the corresponding English command.
For example:
! After these mappings, you can write your program using Greek commands directly

ΠΡΟΒΟΛΗ fix  VIEW
ΟΘΟΝΗ   fix  SCREEN
ΧΡΩΜΑ   fix  COLOR
ΣΒΗΣΙΜΟ fix  CLS
ΤΥΠΩΣΕ  fix  PRINT
ΠΑΥΣΗ   fix  PAUSE

ΑΡΧΗ#
ΠΡΟΒΟΛΗ 11
ΟΘΟΝΗ 80, 30, 1000
ΣΒΗΣΙΜΟ
ΧΡΩΜΑ 0, 7
ΤΥΠΩΣΕ "Υποστηρίζω Ελληνικά"
ΠΑΥΣΗ
All source code, tokens, labels, and strings are handled as Wide, enabling case-sensitive Greek and Latin text everywhere.
✍️ Note: To display Greek characters correctly, Hobby BASIC requires a raster font that supports Wide glyphs.
🛠️ DEBUG() Window Examples
Use the DEBUG window to visualize variable contents in real time:
dim values[5] = 10, 20, 30, 40, 50

for i = 0 to 4
  DEBUG(i, values[i])  ! show key-value pairs in debugger
next
Viewing output of an external command.
exec "tasklist", list$
debug(list$)
This will show the list of running processes from the Windows tasklist command directly inside the DEBUG window.
🗄️ Registry Module
Hobby BASIC 2.5.5 includes a registry module (REGISTRY.BAS) for reading and writing Windows registry values.
%include "EXAMPLES\MODULES\REGISTRY.BAS"

! Returns the processor name (e.g., "Intel(R) Core(TM) i7-8700K CPU @ 3.70GHz")
sub GetProcessorName()
    rets RegReadString(HKEY_LOCAL_MACHINE, "HARDWARE\DESCRIPTION\System\CentralProcessor\0", "ProcessorNameString")
ends

DEBUG("Processor Name :" , GetProcessorName())
pause
end
Sample DEBUG Output:
Processor Name: Intel(R) Core(TM) i7-8700K CPU @ 3.70GHz
💡 Note: The actual output depends on your processor.
What's happening here?
RegReadStringreads the processor name from the registry- The subroutine
GetProcessorName()returns a string directly DEBUGreceives and displays the string without any intermediate variable- This works because v2.5.5 subroutines can return strings directly, not just integers
👉 See also: A high-score table stored entirely in the registry (FASM forum).
🔗 Run Remote Scripts Anywhere
One of Hobby BASIC’s unique features is the ability to run remote .BAS scripts
directly from the command line, without needing to download them manually. Try the following in the command line and see what it does.
HB.EXE https://files.catbox.moe/ia9qt7.BASAlternatively, you can run remote scripts dynamically from within another .BAS program:
exec "run https://files.catbox.moe/ia9qt7.BAS"This command fetches the .BAS file from the specified URL, loads it into memory, and executes it in the console.
⚠️ Security Warning: Scripts from remote URLs run with full privileges. Only run code from trusted and verified sources.
🧮 Floating-Point Functions
Hobby BASIC supports optional floating-point math through external functions. All arguments and results are passed as strings, making it easy to use floats without affecting the integer core.
print FADD("3.14", "2.0")         ! "5.14"
print FSUB("10", "2.5")           ! "7.50"
print FMUL("3.0", "2.0")          ! "6.00"
print FDIV("1.0", "0.0")          ! "0.00"

! Using variables, strings, arrays, types
x$ = "3.14" : y = 2
dim a$[] = "1.5", "2.5"
type T (x$ = "3.5", y$ = "2.5")

print FADD(x$, y)                 ! "5.14"
print FADD(a$[0], a$[1])          ! "4.00"
print FMUL(T:[0].x$, T:[0].y$)    ! "8.75"
⭕ Drawing a circle in console using FPU string math and TIMES command.
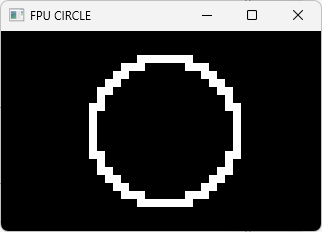
▶ View source code
    ! ----------------------------------------------------------------------------------------
    ! TIMES WITH FPU STRINGS
    ! Drawing a circle in console using FPU string math and TIMES command
    ! Note: TIMES uses backslash (\) as continuation character for multi-line blocks
   ! ----------------------------------------------------------------------------------------

    ! Initialize display (font size 8x8)
    title "FPU CIRCLE"
    view 7
    screen 40, 25, 0
    cursor 0
    color 0, 15
    cls

    times 360 \
        ! Calculate circle coordinates (360 degrees in radians)
        a$ = FDIV(FMUL(V3,"6.28318"),"360.0") : \
        x = VAL(FROUND(FADD("20.0",FMUL(FSIN(a$),"9.0")),"NEAREST")) : \
        y = VAL(FROUND(FADD("12.0",FMUL(FCOS(a$),"9.0")),"NEAREST")) : \
        if x >= 0 and x < 40 and y >= 0 and y < 25 then at x, y, "█"

        ! Clean exit
        inkey
        color 0, 7 : cls
        view 11
        end
👉 Why strings?
Floating-point functions operate on string arguments to maintain compatibility with Hobby's integer-based architecture. This makes conversions explicit and avoids hidden side effects. It also keeps the system small, portable, and easy to debug. See the Hobby BASIC manual for more details about the floating-point set and how to use it effectively in your programs.
⚙️ Win32 Power with syscall
With Hobby BASIC you can call Windows API functions, unlocking features beyond standard BASIC —from message boxes to launching programs, querying system info, or even experimenting with simple GDI graphics in the console.
syscall "user32.dll", "MessageBoxW", 0, "Hello from BASIC!", "Title", 0APIs can also return values. For example, get system uptime in milliseconds:
syscall "kernel32.dll", "GetTickCount"
print "Milliseconds since boot: ", V0
Or play a simple system beep using kernel32.dll:
syscall "kernel32.dll", "Beep", 750, 300Structures made of DWORD fields are supported by using arrays with
byref, letting you call functions such as GetWindowRect to retrieve window dimensions.
⚠️ Warning: Native API calls run with full privileges. Incorrect use may cause crashes. Use only documented functions and safe values!
📖 See the Hobby BASIC Manual for details and the EXAMPLES\API folder for samples.
🛠️ Super Tiny BASIC – Built with Hobby BASIC
Super Tiny BASIC is a ~900-line '80s-style BASIC interpreter written entirely in Hobby BASIC — a fun proof of what the language can do.
It supports single-letter variables (A–Z), single-line IF statements, structured loops (FOR/NEXT, WHILE/WEND), classic I/O (PRINT, INPUT), subroutines (GOSUB/RETURN), and essential console commands.
👉 It can be enjoyed as:
- 🎮 A toy environment for newcomers to play and learn programming basics.
- 📼 A retro playground for experienced BASIC programmers.
- 🧩 A compact codebase open to modifications, enhancements, experiments, and pure programming fun.
✨ Features
- 💬
REMcomments - 🔢 Numeric expressions and logical operators
- 🎲 Built-in functions:
RND(),CHR() - 🎨 Console control:
LOCATE,COLOR,CLS,WAIT,INKEY - 💾 File operations:
LOAD,SAVE - ⚠️ Limitations: numeric variables only (A–Z), max 1,000 lines, runs inside the Hobby BASIC Interpreter.
📖 Example
10 FOR I = 1 TO 5
20 PRINT "Hello, World!"
30 NEXT I
👉 Type in lowercase — the interpreter converts keywords and variables automatically.
👉 The program, TEST.BAS, showcases all the features of Super Tiny BASIC.
🎮 Demo Game
A full Hobby BASIC demo running inside the Windows 10 console.
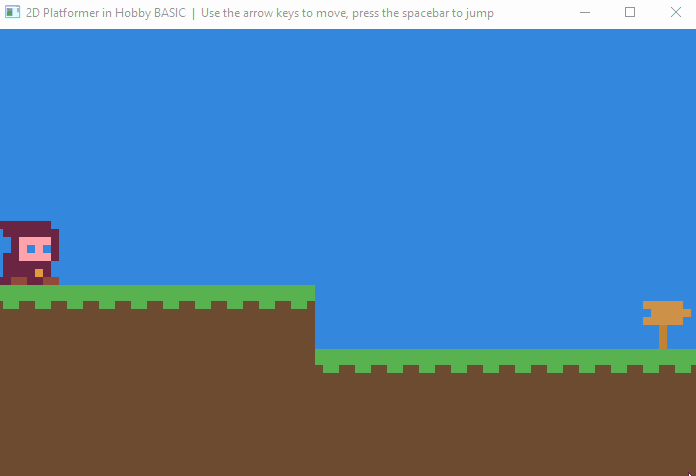
▶ View source code
    ! ----------------------------------------------------------------------------------------
    !  DEMO.BAS
    !  Hobby BASIC Interpreter
    !  Example program from the Hobby BASIC collection.
    !
    ! ----------------------------------------------------------------------------------------
    !  DEMO DESCRIPTION
    ! ----------------------------------------------------------------------------------------
    !
    !  2D Platformer Demo with physics and multi-level progression.
    !  Jump, climb ladders, and navigate through 4 challenging levels.
    !  Features smooth character animation, collision detection, and gravity physics.
    !
    !  Controls:
    !  - Arrow Keys: Move left/right and climb ladders
    !  - Space: Jump
    !  - ESC: Exit game
    !
    ! ----------------------------------------------------------------------------------------
    !  COMPATIBILITY NOTE
    ! ----------------------------------------------------------------------------------------
    !
    !  For Windows 10/11:
    !  Enable "Use Legacy Console" in Properties for proper display
    !  (Right-click title bar → Properties → Options tab)
    !
    ! ----------------------------------------------------------------------------------------

    ! ----------------------------------------------------------------------------------------
    !  SYSTEM CONSTANTS AND INITIALIZATION
    ! ----------------------------------------------------------------------------------------

    FILE_OR_FOLDER_EXISTS = 3
    MB_ICONERROR = 0x10

    ! System compatibility check
    if VAL(PATH(6)) < 6
        alert MB_ICONERROR, PATH(3), "Demo Requires Windows 7 or later" : end
    endif

    ! Load graphics tileset
    path_gfx$ = PATH("DATA\SNAP\TILESET.HB")
    if FILE(path_gfx$, FILE_OR_FOLDER_EXISTS) = 0
        alert MB_ICONERROR, "Tileset not found", path_gfx$ : end
    endif

    ! Sound initialization
    JUMP_SND = 700
    sound PATH("DATA\MEDIA\SFX\WAV\SFX1.WAV"), JUMP_SND

    ! Virtual key codes for input handling
    enum VK_LEFT=37, VK_UP, VK_RIGHT, VK_DOWN
    VK_ESC = 27
    VK_SPACE = 32

    ! ----------------------------------------------------------------------------------------
    !  GAME CONSTANTS
    ! ----------------------------------------------------------------------------------------

    FRAME_RIGHT = 7      ! Character sprite facing right
    FRAME_LEFT = 17      ! Character sprite facing left (mirrored)
    FRAME_CLIMB = 8      ! Character climbing sprite
    TILE_SIZE = 8        ! Size of each tile in cells
    JUMP_OFFSET = 12     ! Maximum jump height in cells
    GAME_INTERVAL = 20   ! Frame time in milliseconds
    level = 1            ! Current level (1-4)

    ! ----------------------------------------------------------------------------------------
    !  COLOR PALETTE (16-color palette for the game)
    ! ----------------------------------------------------------------------------------------

    dim rgb_color[] = \
        0x000000, 0x584751, 0x49AB52, 0x3A4994, 0x3E628E, 0x43266B, 0x3381C1, 0xB8A7B0, \
        0xA48E9A, 0xDE8833, 0x52B55A, 0x33A8F3, 0x304C6E, 0xACA2FF, 0x4892CE, 0xC9BBC2

    ! ----------------------------------------------------------------------------------------
    !  LEVEL DESIGNS
    !  Tile IDs:
    !  0 = Empty/background
    !  1 = Solid ground
    !  2 = Platform blocks
    !  3 = Special block 1
    !  4 = Ladder
    !  5 = Ladder top
    !  6 = Special block 2
    !  9 = Level exit/goal
    ! ----------------------------------------------------------------------------------------

    dim map1[11,7] = \
    2,2,2,2,2,2,2,2,2,2,2, \
    2,2,2,2,2,2,2,2,2,2,2, \
    2,2,2,2,2,2,2,2,2,2,2, \
    2,2,2,2,2,2,2,2,2,2,2, \
    1,1,1,1,1,2,2,2,2,2,9, \
    0,0,0,0,0,1,1,1,1,1,1, \
    0,0,0,0,0,0,0,0,0,0,0

    dim map2[11,7] = \
    2,2,2,2,2,2,2,2,2,2,2, \
    2,2,2,2,2,2,2,2,2,2,2, \
    2,2,2,2,2,2,2,2,2,2,9, \
    2,2,2,2,2,2,2,5,1,1,1, \
    2,2,2,2,2,2,2,4,0,0,0, \
    1,1,1,1,1,1,1,1,0,0,0, \
    0,0,0,0,0,0,0,0,0,0,0

    dim map3[11,7] = \
    2,2,2,2,2,2,2,2,2,2,2, \
    2,2,2,2,2,2,2,2,2,2,2, \
    2,2,2,2,2,2,2,2,2,2,2, \
    1,1,1,1,5,2,2,2,2,2,2, \
    0,0,0,0,4,2,2,6,2,2,9, \
    0,0,0,0,4,2,1,1,1,1,1, \
    0,0,0,0,1,1,0,0,0,0,0

    dim map4[11,7] = \
    2,2,2,2,2,2,2,2,2,2,2, \
    2,2,2,2,2,2,2,2,2,2,2, \
    2,2,2,2,2,2,2,2,2,2,2, \
    2,2,2,2,2,2,2,2,2,2,9, \
    1,1,1,1,5,2,2,3,2,2,1, \
    0,0,0,0,4,2,2,2,2,2,0, \
    0,0,0,0,1,1,1,1,1,1,0

    ! Player starting positions for each level (tile coordinates: x, y)
    dim hero_start_positions$[] = "00","03","04","02","03"

    ! ----------------------------------------------------------------------------------------
    !  DISPLAY INITIALIZATION
    ! ----------------------------------------------------------------------------------------

    title "🎮 2D Platformer Demo  •  Use ← ↑ →, Space to jump"

    view 0, 7                 ! Hide window, 8x8 pixel font
    screen 80, 75, 0          ! Set console size
    cursor 0                  ! Hide cursor
    color 0, 0                ! Black text on black background
    cls                       ! Clear screen

    ! Load tileset graphics
    snap 0, 0, path_gfx$

    ! Copy individual tiles from tileset to graphic slots
    for i = 0 to 7
        bsave i * 8, 0, TILE_SIZE, TILE_SIZE, i
    next

    ! Special tiles (mirrored left-facing sprite and climbing)
    flip 56,0,TILE_SIZE,TILE_SIZE,0            ! Create mirrored sprite
    bsave 56,0,TILE_SIZE,TILE_SIZE,17          ! Store as left-facing frame
    bsave 64,0,TILE_SIZE,TILE_SIZE,8           ! Climbing frame
    bsave 72,0,TILE_SIZE,TILE_SIZE,9           ! Special tile

    ! Apply color palette to all 16 colors
    for i = 0 to 15
        rgb i, rgb_color[i]
    next

    ! ----------------------------------------------------------------------------------------
    !  GAME SUBROUTINES
    ! ----------------------------------------------------------------------------------------

    ! ----------------------------------------------------------------------------
    !  Update character position and sprite
    !  Parameters: x, y = character coordinates, frame = sprite frame to display
    ! ----------------------------------------------------------------------------
    sub update_character(x, y, frame)
        bloads x, y, frame
    ends

    ! ----------------------------------------------------------------------------
    !  Check if character is on a ladder at given position
    !  Returns: 1 if on ladder, 0 otherwise
    ! ----------------------------------------------------------------------------
    sub is_on_ladder(x, y)
        for local i = 1 to TILE_SIZE - 1
            cinfo x + i, y - 1
            if V1 = 4 then rets 1  ! Color 4 = ladder
        next
        rets 0
    ends

    ! ----------------------------------------------------------------------------
    !  Check if character should fall (no ground below)
    !  Returns: 1 if falling, 0 if on solid ground
    ! ----------------------------------------------------------------------------
    sub check_falling()
        for local i = 1 to TILE_SIZE - 1
            cinfo x + i, y + TILE_SIZE
            if MATCH(V1,1,7,8,10,12,15) then jumping = 0 : rets 0
        next
        rets 1
    ends

    ! ----------------------------------------------------------------------------
    !  Check if character can move in horizontal direction
    !  Parameters: dx = direction (-1 for left, TILE_SIZE for right)
    !  Returns: 1 if movement allowed, 0 if blocked
    ! ----------------------------------------------------------------------------
    sub can_move_horizontal(dx)
        for local i = 0 to TILE_SIZE - 1
            cinfo x + dx, y + i
            if MATCH(V1,1,7,8,10,12,15) then rets 0
        next
        rets 1
    ends

    ! ----------------------------------------------------------------------------
    !  Render the current level map to the screen
    ! ----------------------------------------------------------------------------
    sub render_level_map()
        for local y = 0 to map_height-1
            for local x = 0 to map_width-1
                bloads x * TILE_SIZE, y * TILE_SIZE, map[x, y]
            next
        next
    ends

    ! ----------------------------------------------------------------------------------------
    !  LEVEL SETUP AND INITIALIZATION
    ! ----------------------------------------------------------------------------------------

    start#
        view 0  ! Hide console window

        ! Level cycling (1-4)
        if level > 4 then level = 1

        ! Get current map dimensions
        map//level[].SIZE
        map_width = V1
        map_height = V2

        ! Create and copy level map
        dim map[map_width, map_height]
        map[].COPY map//level[]

        ! Calculate screen dimensions
        ROWS = map_width * TILE_SIZE
        COLS = map_height * TILE_SIZE

        ! Create background buffer
        dim stage[ROWS, COLS]

        ! Set up graphics area
        screen ROWS, COLS, 0
        color 9, 9
        paint TILE_SIZE, TILE_SIZE, ROWS, COLS, -1, -1

        ! Render level and capture to buffer
        dir = 1  ! Start facing right
        render_level_map()
        grab 0, 0, ROWS, COLS, stage[], 0

        ! Initialize timing for frame rate control
        lastGameTime = PEEK(0) & 0x7FFFFFFF

        ! Set player starting position
        hero_start$ = hero_start_positions$[level]
        tile_x = VAL(LEFT(hero_start$, 1))
        tile_y = VAL(RIGHT(hero_start$, 1))
        x = tile_x * TILE_SIZE
        y = tile_y * TILE_SIZE

        ! Display character at starting position
        update_character(x, y, FRAME_RIGHT)
        view 1  ! Show console window

    ! ----------------------------------------------------------------------------------------
    !  MAIN GAME LOOP
    ! ----------------------------------------------------------------------------------------

    main#
        ! Frame rate control
        currentTime = PEEK(0) & 0x7FFFFFFF
        if currentTime - lastGameTime < GAME_INTERVAL
            wait 1  ! Reduce CPU usage while waiting
            goto main
        endif

        ! ------------------------------------------------------------------------
        !  JUMPING AND GRAVITY SYSTEM
        ! ------------------------------------------------------------------------
        if jumping
            ! Character is currently jumping upward
            if y = JUMP_HEIGHT
                jumping = 0  ! Reached jump peak
                vy = 1       ! Start falling
            endif
        else
            ! Check if character should fall
            vy = check_falling()
            if vy = 0 then onGround = 1 else onGround = 0
        endif

        ! Jump initiation (space bar while on ground or ladder)
        if KEY(VK_SPACE) and (onGround or is_on_ladder(x, y))
            sound JUMP_SND  ! Play jump sound
            jumping = 1
            onGround = 0
            JUMP_HEIGHT = y - JUMP_OFFSET  ! Calculate jump peak
            vy = -1  ! Start moving upward
        endif

        ! ------------------------------------------------------------------------
        !  LADDER CLIMBING
        ! ------------------------------------------------------------------------
        if KEY(VK_UP) and is_on_ladder(x, y)
            ! Continuous climbing while up key is pressed
            while 1
                if KEY(VK_UP)
                    grab x, y, TILE_SIZE, TILE_SIZE, stage[], x, y
                    y--  ! Move up one cell
                    update_character(x, y, FRAME_CLIMB)
                    wait 20  ! Climbing speed
                elseif KEY(VK_DOWN) or not is_on_ladder(x, y + TILE_SIZE - 1)
                    break  ! Stop climbing
                endif
            endw
        endif

        ! ------------------------------------------------------------------------
        !  HORIZONTAL MOVEMENT
        ! ------------------------------------------------------------------------
        if KEY(VK_LEFT) and can_move_horizontal(-1) and x > 0
            dir = -1  ! Facing left
            vx = -1   ! Moving left
        elseif KEY(VK_RIGHT) and can_move_horizontal(TILE_SIZE)
            ! Check if reached level exit (right edge)
            if x > ROWS - 10
                level++  ! Advance to next level
                goto start
            endif
            dir = 1  ! Facing right
            vx = 1   ! Moving right
        else
            vx = 0   ! No horizontal movement
        endif

        ! ------------------------------------------------------------------------
        !  UPDATE CHARACTER POSITION AND DISPLAY
        ! ------------------------------------------------------------------------
        if vx or vy or jumping
            ! Restore background at old position
            grab x, y, TILE_SIZE, TILE_SIZE, stage[], x, y

            ! Update character coordinates
            x += vx
            y += vy

            ! Draw character with correct facing direction
            if dir = -1
                update_character(x, y, FRAME_LEFT)
            else
                update_character(x, y, FRAME_RIGHT)
            endif
        endif

        ! Update timing for next frame
        lastGameTime = currentTime

        ! Continue unless ESC key is pressed
        if not KEY(VK_ESC) then goto main

    ! ----------------------------------------------------------------------------------------
    !  CLEAN EXIT
    ! ----------------------------------------------------------------------------------------

    color 0,7 : cls  ! Clear with black on white
    view 11          ! 8x12 pixel font
    end
🎨 P2P Drawing
Collaborative real-time drawing using UDP peer-to-peer networking running inside the Windows 10 console.
▶ View source code
    ! ----------------------------------------------------------------------------------------
    !  P2PDRAW.BAS
    !  Hobby BASIC Interpreter
    !  Example program from the Hobby BASIC collection
    !
    ! ----------------------------------------------------------------------------------------
    !  APPLICATION DESCRIPTION
    ! ----------------------------------------------------------------------------------------
    !
    !  Peer-to-peer collaborative drawing application using UDP sockets.
    !  Draw together with remote users in real-time - left click to paint,
    !  right click to erase. Press SPACE to clear both screens simultaneously.
    !
    !  Controls:
    !  - Left Click: Draw/paint cell
    !  - Right Click: Clear/erase cell
    !  - SPACE: Clear both screens (synchronized)
    !  - ESC: Exit application
    !
    ! ----------------------------------------------------------------------------------------
    !  NETWORK FEATURES
    ! ----------------------------------------------------------------------------------------
    !
    !  - Real-time drawing synchronization
    !  - Peer-to-peer UDP communication
    !  - Coordinate and color encoding
    !  - Synchronized screen clearing with feedback
    !  - Local network or localhost operation
    !
    ! ----------------------------------------------------------------------------------------

    ! --- Constants ---
    VK_ESC = 27
    VK_SPACE = 32
    CMD_CLEAR$ = "P2PDRAW_CLEAR_SCREEN"

    ! --- Port configuration ---
    enum PORT1=50002, PORT2
    REMOTE_IP$ = "localhost"
    LOCAL_PORT  = PORT1
    REMOTE_PORT = PORT2

    ! --- Open UDP socket ---
    if OPEN(LOCAL_PORT) = -1
        print "Socket error ", STR(V0) : pause : end
    endif

    ! --- Mouse initialization ---
    mouse() fix mouse : x = V0 : y = V1 : btn = V2
    px = -1
    py = -1
    dim a$[10000]

    ! --- Screen setup ---
    title "P2P Drawing - " + PATH(8) + " - SPACE to clear both"
    view 11
    screen 80, 30, 0
    cursor 0
    color 0, 0
    cls
    gosub RedrawControls

    ! --- Main loop ---
    do
        ! --- SPACE: Synchronized clear ---
        if KEY(VK_SPACE)
            cls
            gosub RedrawControls
            pen 13
            at 32, 12, "CLEARING..."
            wait 250
            SEND(REMOTE_IP$, REMOTE_PORT, CMD_CLEAR$)
            at 32, 12, "SCREEN CLEARED!"
            wait 250
            at 32, 12, "               "
            pen 15
            wait 250
        endif

        ! --- Mouse drawing ---
        n = 0
        mouse()
        if (btn = 1 or btn = 2)
            c = IIF(btn = 2, 32, 0x2588)
            pen 13 : at 0, 0, "DRAWING..."

            do
                mouse()
                if (x <> px or y <> py)
                    pen 15
                    at x, y, CHR(c)
                    a$[n] = STR((((x << 7) | y) << 15) | c)
                    n++
                    px = x
                    py = y
                endif
            until btn = -1

            at 0, 0, "         "

            ! --- Send with progress feedback ---
            if n > 0
                pen 14
                at 0, 0, "SENDING"
                for i = 0 to n-1
                    SEND(REMOTE_IP$, REMOTE_PORT, a$[i])
                    pen 14
                    at 8, 0, STR(i+1) + "/" + STR(n)
                    wait 1
                next
                at 0, 0, "       "
                at 8, 0, "        "
                wait 10
            endif
        endif

        ! --- Handle incoming messages ---
        while LEN(QUEUE(1))
            msg$ = QUEUE(0)

            if msg$ = CMD_CLEAR$
                cls
                gosub RedrawControls
                pen 13
                at 32, 12, "SCREEN CLEARED!"
                wait 250
                at 32, 12, "               "
                pen 15
            else
                n = VAL(msg$)
                x = BITS(n, 28, 7)
                y = BITS(n, 21, 7)
                c = BITS(n, 14, 15)
                pen 9
                at x, y, CHR(c)
            endif
        endw

        wait 1
    until KEY(VK_ESC)

    CLOSE()
    end

RedrawControls#
    locate 6, 28
    pen 11  : print "LEFT=Draw ";
    pen 12  : print "RIGHT=Erase ";
    pen 10  : print "SPACE=Clear Both ";
    pen 14  : print "ESC=Exit"
    pen 15
    return
🌐 Network Diagnostics
UDP and internet testing with visual DEBUG() output.
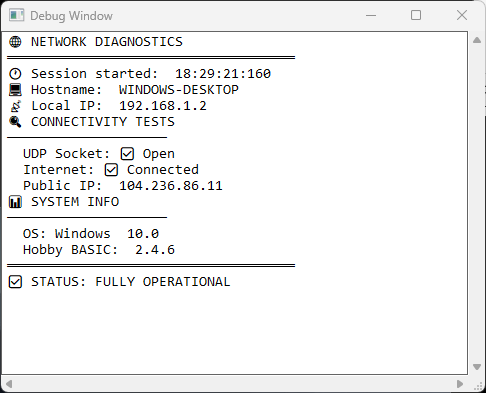
▶ View source code
    ! ----------------------------------------------------------------------------------------
    !  NETWORK.BAS
    !  Hobby BASIC Interpreter
    !  Example program from the Hobby BASIC collection
    !
    ! ----------------------------------------------------------------------------------------
    !  PROGRAM DESCRIPTION
    ! ----------------------------------------------------------------------------------------
    !
    !  Complete network testing with DEBUG() window
    !
    !  Features:
    !  - UDP socket connectivity testing
    !  - Internet access verification with public IP lookup
    !  - Visual feedback with emoji and color coding
    !  - System information display
    !  - Real-time status reporting in DEBUG() window
    !
    ! ----------------------------------------------------------------------------------------

    DEBUG("CLEAR")
    DEBUG("🌐 NETWORK DIAGNOSTICS")
    DEBUG("════════════════════════════════════")

    DEBUG("🕐 Session started: ", PATH(10))
    DEBUG("💻 Hostname: ", PATH(7))
    DEBUG("📡 Local IP: ", PATH(8))

    DEBUG("🔍 CONNECTIVITY TESTS")
    DEBUG("────────────────────")

    socket_test = OPEN(0)
    if socket_test <> -1
        DEBUG("  UDP Socket: ✅ Open")
        CLOSE()
    else
        DEBUG("  UDP Socket: ❌ Failed")
    endif

    public_ip$ = GETURL("https://api.ipify.org")
    if LEN(public_ip$) > 0
        DEBUG("  Internet: ✅ Connected")
        DEBUG("  Public IP: ", public_ip$)
    else
        DEBUG("  Internet: ❌ No connection")
    endif

    DEBUG("📊 SYSTEM INFO")
    DEBUG("────────────────────")
    DEBUG("  OS: Windows ", PATH(6))
    DEBUG("  Hobby BASIC: ", PATH(5))

    DEBUG("════════════════════════════════════")

    if socket_test <> -1 and LEN(public_ip$) > 0
        DEBUG("✅ STATUS: FULLY OPERATIONAL")
    else
        DEBUG("⚠️  CHECK NETWORK SETTINGS")
    endif

    cls
    print "Check DEBUG() window for network diagnostics"
    inkey
    end
📘 About Hobby BASIC
Hobby BASIC is a lightweight yet surprisingly powerful BASIC interpreter for the Windows console, written entirely in x86 assembly.
It enables the creation of games with ANSI graphics in the console, which is quite unusual.
What began in 2015 as a personal fun project continues to evolve to this day.
This quick guide offers just a small glimpse of what Hobby BASIC can do.
👉 To download it and learn more, visit the Hobby BASIC topic on the Flat Assembler forum.
👉 Get the file directly right here -- Unzip the HB folder and you're ready to go.
👉 Watch a full video tour on YouTube to see Hobby BASIC in action.
Chrome may say: “This file is dangerous, so Chrome has blocked it.”
👉 Press CTRL + J and choose to Keep the file.
Windows Defender might also block it — you can:
- Temporarily disable real-time protection
- Add an exception after installing
Hobby BASIC started on Windows XP, continued on 7, and is now focused on Windows 10 and 11.
Some examples still work on older systems!
📌 Enable Legacy Console Mode
To ensure full compatibility with ANSI graphics and console behavior:
- Windows 10: Right-click the console title bar → Properties → Check "Use legacy console" → Restart the console
-
Windows 11 (24H2 and newer):
- Go to Settings > System > Optional Features
- Click Add a feature and search for "Legacy Console"
- Install it, then go to Settings > Privacy & Security > For Developers → Change terminal to Windows Console Host
- Now open the console and enable "Use legacy console" as before
Don’t let system warnings discourage you. Experiment. Learn. That’s the spirit of hobby programming!
🔚 Conclusion
This guide covers the fundamental concepts of Hobby BASIC, from conditions and loops to functions and drawing tools. With this knowledge, you can start creating your own programs.